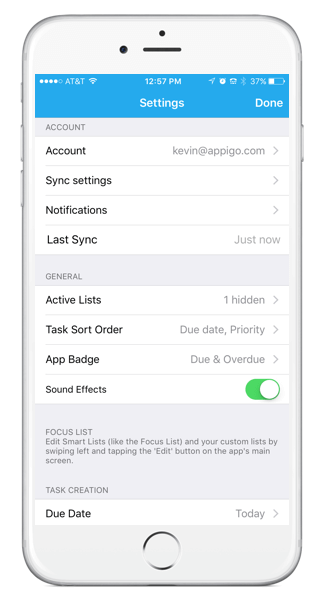
Accessing the general app settings screen is done by clicking on your name (or “Get Started” if you haven’t signed in yet) in the top left of the main app screen. There’s a lot that you can do here, so let’s take a few minutes to go through what options you’ll see and how to use them.
Account Settings
 Account – This will designate your account information identified as the email associated with the account that you’re signed into. If you are installing TaskFire on a new device, or starting fresh with a new version of that app, you’ll want to ensure here that you’re signed in so that your tasks sync.
Quick Tip: If for some reason you are switching between TaskFire accounts, we recommend that you not only sign out, but also delete and reinstall the app onto your phone. This will ensure the integrity of your data.
Sync settings – This gives you the option to determine how long you want to sync your completed tasks to our server. This can have an effect on the load/setup time when you’re installing the app on a new device, or re-installing the app as well as the data used during this process. Basically, the longer the time frame you select, the more “talking to the server” the app needs to do and therefore the longer load/setup process and more data used.
It’s important to note that the app itself has pre-defined time frames in which it stores completed tasks on the device. It stores recent activity and eventually clears it to avoid storing too much information on the device itself. We do this to ensure that the app operates as quickly and efficiently as possible for the best user experience and that we limit the tax the app takes on storage on your device.
Notifications – This is where you can manage your email notifications (subscription-only feature) for shared lists. You can determine what activity within shared lists that you’d like to be alerted of via email. These actions are:
- Tasks – when someone adds, deletes, or changes a task
- Comments – when someone adds or removes a comment on a task
- Members – when someone is added or removed from the list
- Assigned only – only receive notifications for tasks that are assigned to you
By default, “Tasks”, “Comments” and “Members” are selected, however you can change this any time you’d like. From this screen you can customize the alerts for each list on your device. This can also be done per list from the respective list’s “Edit List” screen. This is accessed by swiping left on the list and selecting “Edit” in the main app view.
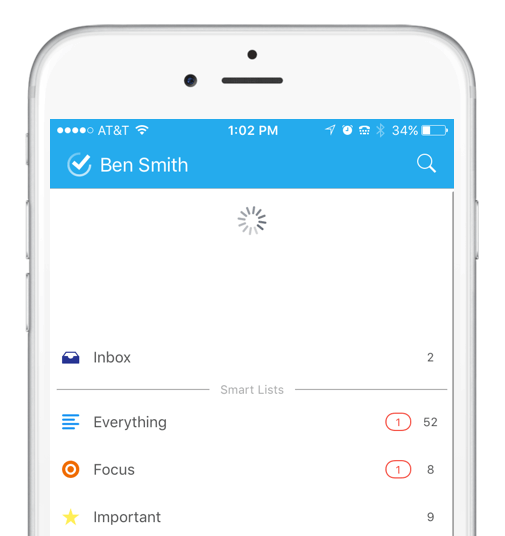
Last Sync – This informs you when the last time that your device synced to the server. This is important if you’re using Todo across multiple devices or if you’re sharing lists with others. By tapping on this line you will push a sync to the server. This can also be done on almost every other screen of the app by pulling down the screen until you see a spinner under the top bar.

It’s important to note that the app is built to push an automatic sync whenever there is a change made in the app (it calls to the Todo server to pull any changes made on other devices in this process as well) but does not pull a sync if activity on the app is dormant. For example let’s say that I’m working on my iPhone and iPad. If I have both devices open and I make a change on my iPhone. My iPhone will push a sync to the server. The iPad will not automatically recognize that sync if dormant. For that to reflect I either need to restart the app, pull down to sync (or tap the “Last Sync” line in settings) or push a change from the iPad.
If you ever experience what you think may look like a sync error (tasks not appearing the same on one device as they appear on another), try use one of the methods above to force a sync. We often find that the reason for what appears to be a sync error is as simple as a sync not having been initiated. If the error persists, please reach out to our support team (more on that below).
General Settings
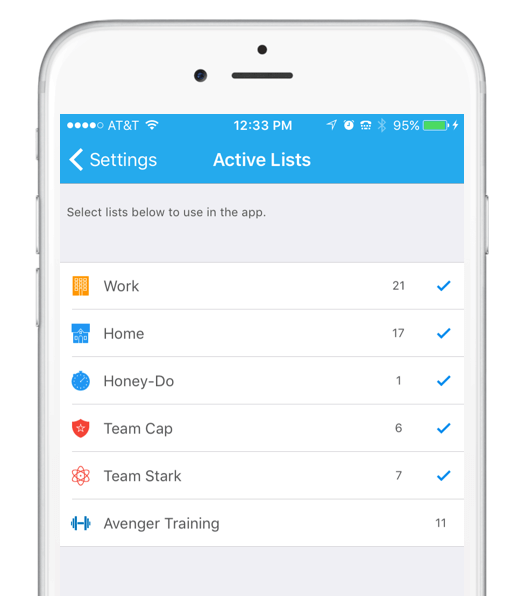
Active Lists – This setting allows you to determine which lists are actively showing in the app. This is commonly used when you want to create a list for a specific event (packing list, planning list, etc.). You’ll find yourself very active in that list but for only a confined amount of time. Instead of deleting and then recreating that list, what you’ll want to do is duplicate the completed tasks in the list (easily done with the Quick Menu) hide that list (so that it isn’t cluttering your main app screen thereby ensuring access to what’s present and most impactful), then un-hide the list when it’s time to use it again.

Task Sort Order – This setting allows you to set a default for order in which tasks appear in lists throughout the app. Your options are:
- Due date, Priority
- Priority, Due date
- Alphabetical
It is important to note that this can be customized per list (Custom or Smart) by accessing the individual list’s settings. This is accomplished by swiping left on the list name and selecting “Edit”.
App Badge – This setting allows you to determine what count will show on the app badge (when viewing your phone’s home screen). Your options are:
- No Badge
- Due and Overdue Tasks
- Overdue Tasks
Or you can choose from one of the following suggested Smart Lists
- Everything
- Focus
- Important
- Someday
Sound Effects – Turn app sound effects “On” or “Off” here. These exist for task creation, task completion and reminders.
Focus List – In previous versions of TaskFire, you edited the Focus List from this settings screen. This is a change with Todo 9.0. The Focus List is now edited from the main app screen by swiping left on the name of the list and selecting “Edit”.
Task Creation Settings
Due Date – This setting allows you to establish a default due date for each new task that is created (unless you designate a due date when the task is created). Your options here are:
- None
- Today
- Tomorrow
- In Two Days
- In Three Days
- In Four Days
- In Five Days
- In Six Days
- In One Week
When the app loads on your device for the first time it will be set to “Today” unless you change it here. It is important to note, that default due dates can also be set on a list level if you’d like. For example I could set all tasks created while viewing my “Work” list to be “Tomorrow” and all the tasks created while viewing my “Home” list to be “In One Week”.
By default this is set to “Today” unless you specify otherwise.
List – This setting allows you to determine where newly-created tasks show up. This means that tasks created from the main app screen, tasks created from Smart Lists (that don’t have a designated task-creation list – see below), tasks that are emailed to Todo, tasks created using 3D Touch and tasks created using Siri will all show up in this designated list.
The exceptions here are:
- When you are creating a task from within a specific Custom List
- When you are creating a task from within a Smart List that you have set a designated list for created tasks (set within the “Edit Smart List” screen)
By default this is set to “Inbox” unless you specify otherwise.
Privacy Settings
Passcode + Touch ID – This is where you can require Passcode or Touch ID security to Todo.
Support Settings
Support – This takes you to support.appigo.com where you can submit a support ticket, and read/engage in forums about using Todo. You’ll also be able to access our library of resources where you can learn how to use Todo better.
Diagnostics – You can access general information about your app version, build etc. This is also where you can access Diagnostic Logs if you’re ever asked to submit one with a support ticket.
Write a Review – If you’re having a great experience we’d be tickled pink if you left us a positive review on the App Store.
If you’re not having a good experience and are hoping for some help, please reach out to support. We often see support requests placed in reviews and unfortunately, due to Apple’s review system, it is nearly impossible for us to match a Todo username to a review. We unfortunately see some specific issues/concerns listed in reviews and want to dig in so that we can solve them, but aren’t able to do so unless we can reach you. Thanks!


